The POND
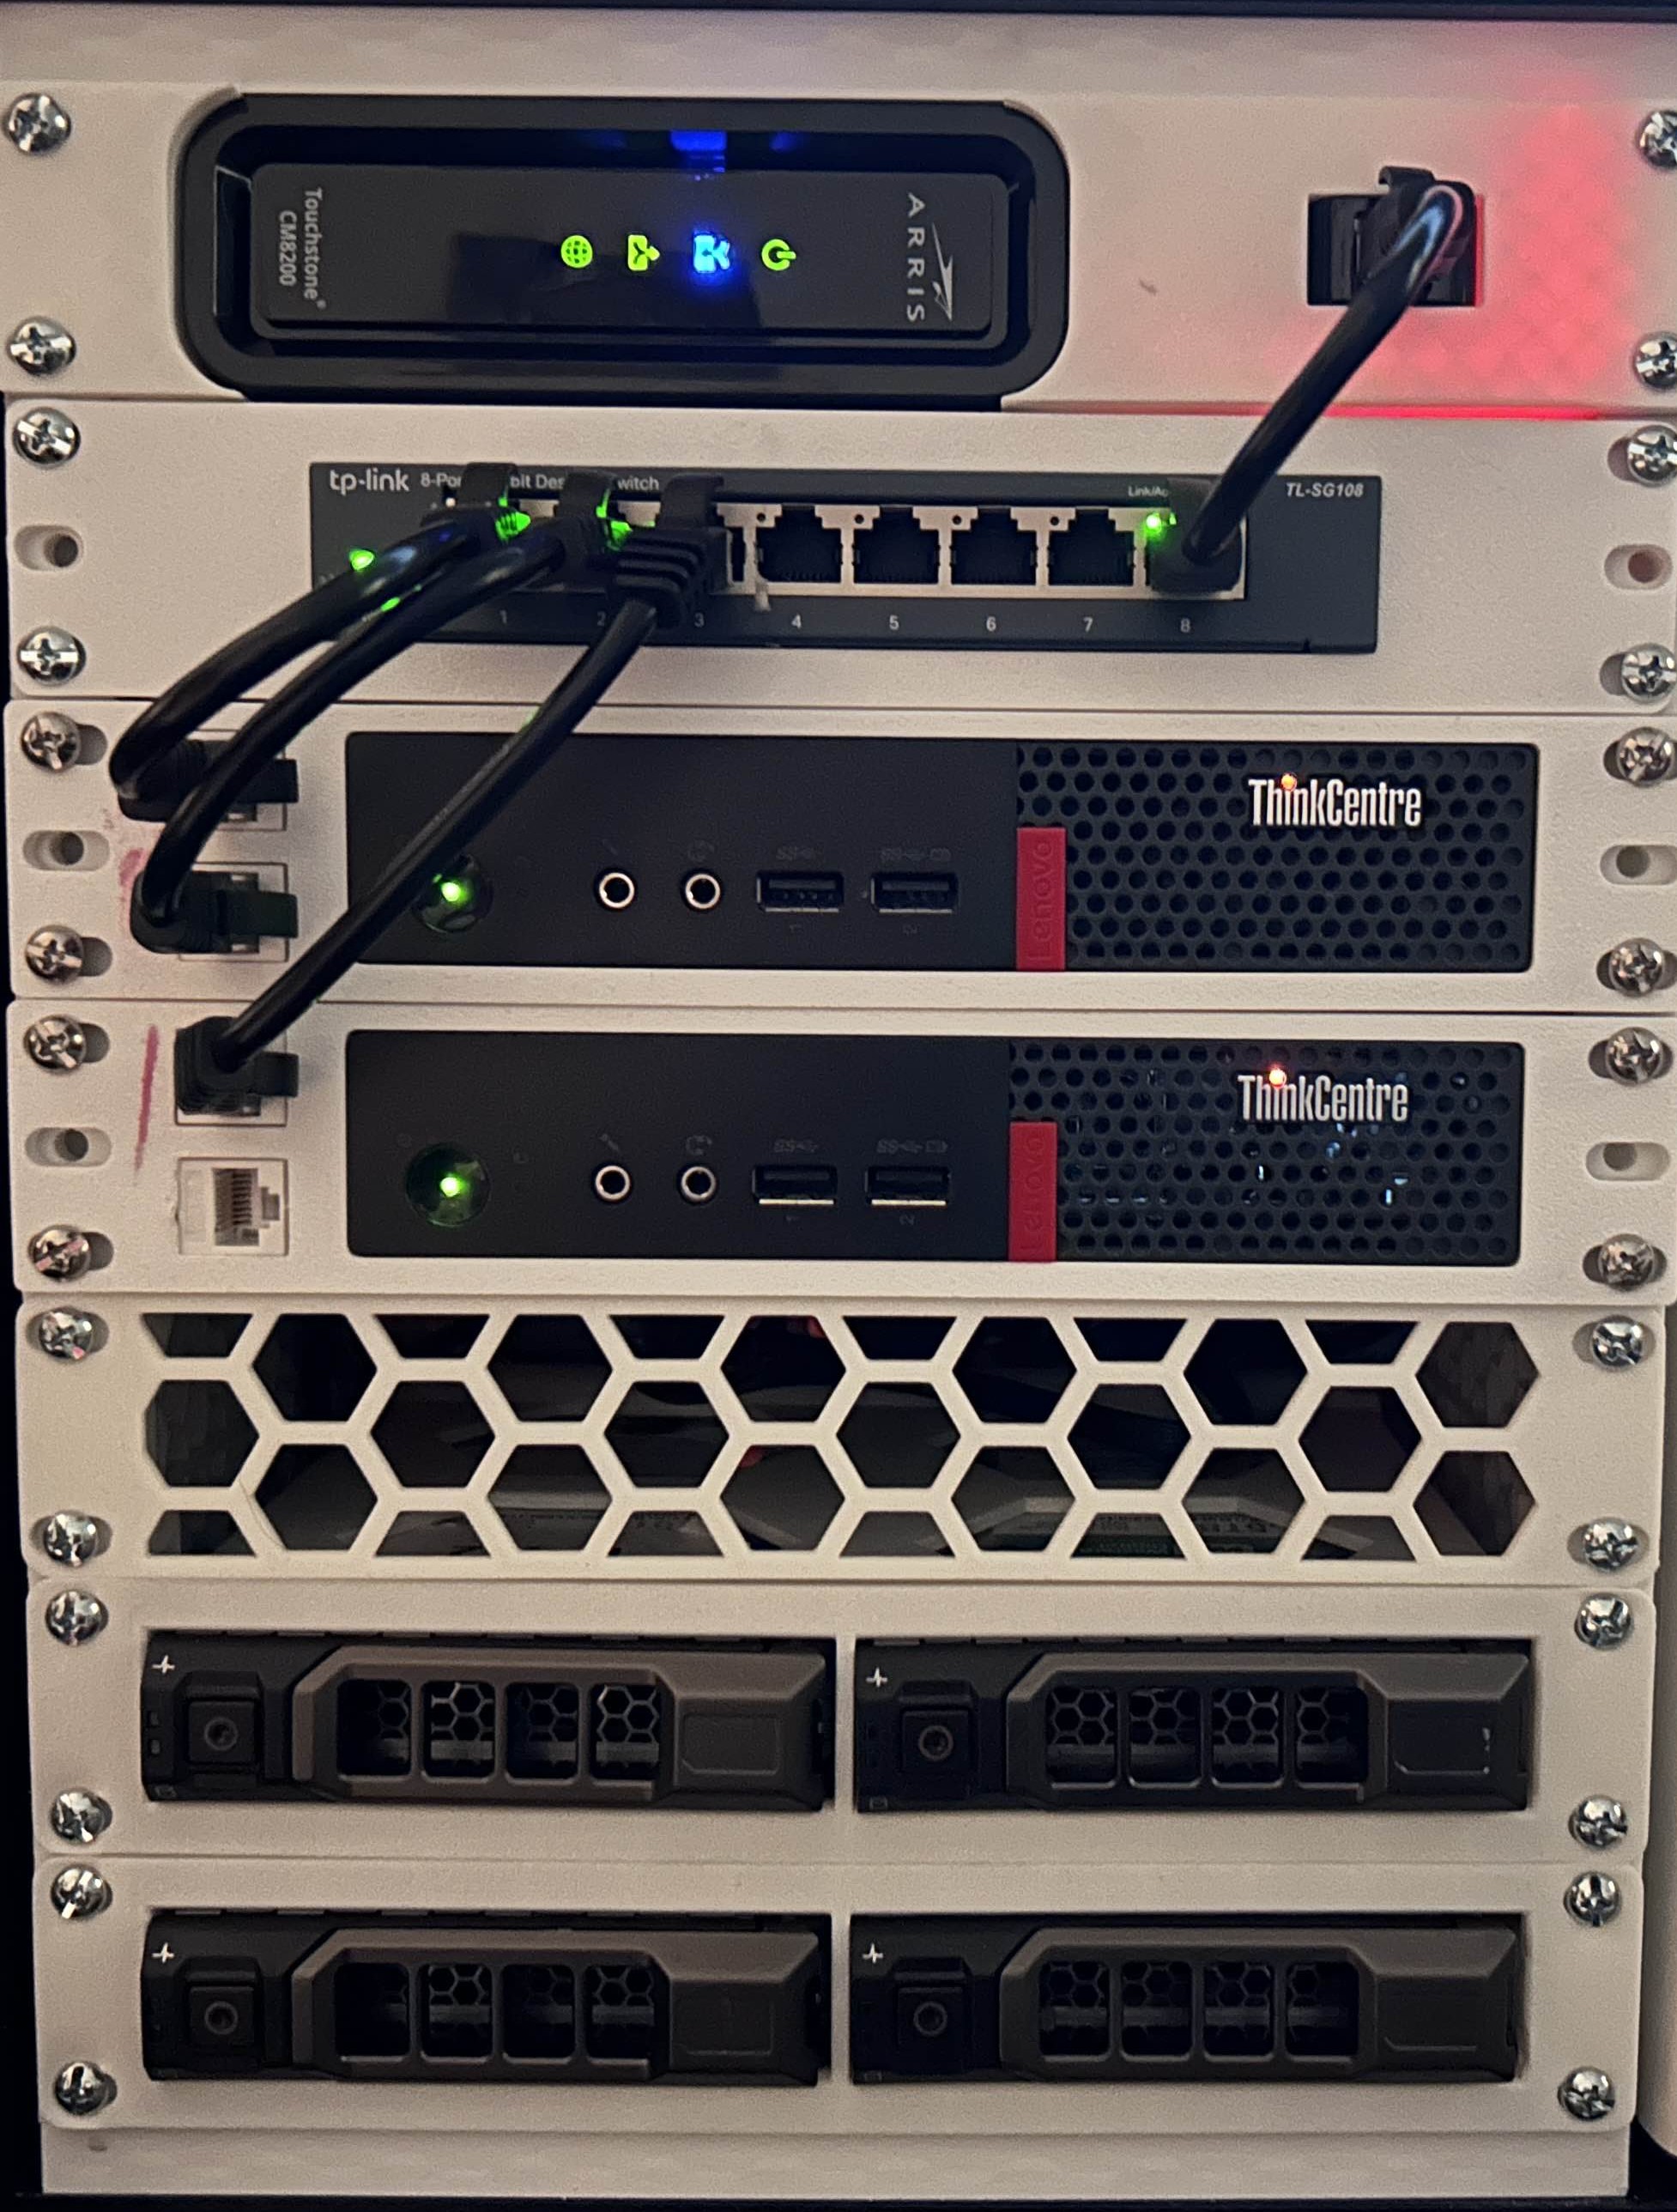
The POND (Partitioned and Organized Networked Devices) is the name of my server rack, which beyond handling internet connectivity, service hosting, and NAS storage, is the place Microcosdom is hosted on. A number of factors inspired me to create it and broadly shift to a more personal, independent, and basic approach to using the internet. I talk more about that here.
Beyond high-minded thoughts about computers and internet as a whole, the initial material impetus for the project was a growing interest in Mini Racks, introduced to me, as most things are, by the fantastic Jeff Geerling, and his Project MINI RACK. I also knew exactly where it would go: inside of one of our three IKEA Kallaxar[1]. Upon my first taking a look at the Mini Rack specifications, my particular brand of brain poison noticed something right away: 254.00 mm (10“) is awfully close to the Bambu X1-Carbon’s 256mm printable area. With that, a bad idea was born.
Component List
| Component | Price | Qty. | Sub-total |
| ThinkCentre M910q | $50.00 | 2 | $100.00 |
| UE300 (USB to Ethernet) | $9.99 | 1 | $9.99 |
| Raspberry Pi 4 (Model B) | $35.00 | 1 | $35.00 |
| TL-SG108 (Network Switch) | $21.99 | 1 | $21.99 |
| ARRIS Touchstone CM8200A | $30.00 | 1 | $30.00 |
| Ethernet Keystone (5-Pack) | $6.99 | 1 | $6.99 |
| 3.5" SATA HDD | $13.00 | 4 | $52.00 |
| Hard Drive Caddy | $5.00 | 4 | $20.00 |
| SATA Male To Female Power (5-Pack) | $5.00 | 1 | $5.00 |
| Adapter 12V DC5525 to 4SATA | $13.10 | 1 | $13.10 |
| 12V 5A Power Adapter | $23.31 | 1 | $23.31 |
| M.2 to SATA3.0 Adapter Card | $14.14 | 1 | $14.14 |
| SATA 3.0 Cable (3-Pack) | $1.00 | 2 | $2.00 |
| 2.5" SATA SSD | $20.00 | 1 | $20.00 |
| Total Price | $353.52 | ||
Frame
The Frame of the server rack was entirely designed and 3d printed by me. It was designed with a few constraints and heuristics in mind. Firstly, rows had to be modular and printable as single pieces, I enjoyed the idea of someone being able to theoretically print a 5U Frame as one contiguous piece, however, I also needed my rack to be larger than that. Additionally, the rack had to fit precisely within its 10“ frame perimeter, including mounting points. Finally, the top and bottom of the rack had to have a variable height to allow it to fit within a non-multiple of 1.75“ dimensioned space.
Getting the X1c to actually use ~99.22% of its printing volume was unsurprisingly a bit involved. There is a guide on Bambu’s wiki, but it does require removing the filament cutter, printing a piece to replace it, not using the AMS, etc. Additionally, as anyone with 3d printing experience would expect, bed adhesion for a 10“ square isn’t exactly great. However, I was able to successfully print a 2U section, 5U section, top, and bottom.
Overall, it came together very well. Both the frame and inserts are assembled using #8-32 nuts and screws, it fits perfectly within an Ikea Kallax, and the hexagonal pattern can be easily cut to allow additional cable routing space. For the electrical, I routed everything within the rack to a single power strip, for easy power cycling. Eventually, I will likely get a UPS, but none of my services require critical up-time.
Layout
Row 1 & 2 - Modem Router
This row serves as the primary Modem/Router providing internet to the rest of the rack, and my home.
The ARRIS Touchstone CM8200A modem connects to the Raspberry Pi 4B’s on-board Ethernet port. The Pi is running OpenWRT, open-source router firmware. Finally, the USB ethernet adapter connected to the pi provides LAN access to the TL-SG108 network switch. Wi-Fi is provided via the Pi’s on-board Wi-Fi chip.
Row 1 is contained in a two part 3d printed housing (STL/STEP). The modem slides in, the Raspberry Pi is held down with M2 screws, and the Ethernet adapter is friction fit in. OpenWRT is intuitive and everything is pretty much plug and play.
Putting together the first row only had a few complications. Per the eBay listing’s recommendation for the modem, I told my ISP it was an ARRIS SB8200, and provided the serial number with the first and last three digits randomized. Additionally, I misread the dimensions on the modem. It turned out to be nearly exactly 1U wide, leaving me with <2 mm of wall thickness on either side for an enclosure. I settled on a 2 part housing design that sandwiches the modem between them. I’m not in love with it, but it should have good ventilation at least. Finally, I was a bit worried about the performance of the Pi’s on-board antenna, but with our small home it has not really caused any problems.
Row 2 is dead simple, the network switch is slotted into a 3d printed housing (STL) by Printables user Celeste. I’m sorry for using version 1, I’m not swapping it unless it breaks.
Row 3 - MY SWEET BABY BOY!
Row 3 is the home of my sweet precious itty bitty baby boy, Otter:
server
@
otter
------------
OS
: Arch Linux x86_64
Host
: ThinkCentre M910q
Kernel
: 6.18.5-arch1-1
Uptime
: 9 days, 18 hours
Packages
: 503 (pacman)
Shell
: zsh 5.9
Terminal
: /dev/pts/0
CPU
: i7-6700T @ 3.6GHz
GPU
: Intel HD Graphics 530
Memory
: 1757MiB / 7822MiB
Otter was the first on-rack device I set up and serves as the host for all of my self-hosted services. To date, that encompasses Microcosdom, Git, Paperless-ngx, and Jellyfin. Additionally, Otter serves as the DNS for my network, using Pi-Hole.
As shown by his Neofetch[2] above, Otter is running Arch Linux. Each of the services above are hosted as either Systemd services when possible or Docker containers if absolutely necessary. Most notably, Microcosdom consists of a static folder generated by Zola and served via nginx.
Also shown in the Neofetch, Otter is running on a ThinkCentre M910q. Used TinyMiniMicro[3] workstations fit comfortably in 1U and can be obtained for relatively cheap. I picked up 2x with 280 GB SSDs, an i7 CPU and 8 gigs of RAM from an eBay auction for $100 total. The ThinkCentre is within a 3d printed housing with an Ethernet Keystone to connect to the Network Switch easily. Additionally, the extra Keystone slot is used to run Ethernet outside of the rack, such as to my desktop in the other room.
Row 4 & 5 - NAS Server
Rows 4 & 5 are home to my other, far less loved son, Beaver:
Well, in actuality, Beaver is entirely on Row 4; row 5 is only used to route SATA cables.
Beaver is made up of another ThinkCentre M910q, held in the same 3d printed housing as Otter. However, Beaver has a few extra changes to allow him to function as a NAS Server. Most notably, Beaver has an M.2 to 6 SATA adapter, one of two crimes against nature in this rack, allowing him to connect to the hard drives in Rows 6 & 7. The M.2 adapter was an evil elegant solution to Beaver’s lack of a PCIe slot, power supply, or SATA port (he technically has one but we’ll talk about it).
The introduction of the M.2 SATA adapter did cause some issues however. Firstly, the M.2 slot on the ThinkCentre is located on its bottom face, accessed through a single panel. On one hand, this was useful as I could leave the panel off to allow cable routing without altering the chassis, on the other hand, the SATA slots, while technically within 1U, left no room for connectors within the row. I considered adding an extension cable to the back of the row, but instead I opted to leave the row underneath it blank and use it for cable routing. Additionally, using the only M.2 slot (technically there is another, but it does not have a header soldered on) to connect bulk storage, left me without a hard drive for an operating system. Luckily, there is actually a single SATA port within the ThinkCentre, so I opted to order a low capacity 2.5“ SSD to run the server.
Beaver runs TrueNas, a widespread and open-source data storage operating system. I’m not particularly familiar with TrueNAS, but the installation was simple and the web UI is intuitive, so I haven’t had to become familiar. I am running a RAIDZ pool, dubbed LAKE (Large Array for Keeping Everything), using the hot swappable 3.5“ hard drives in Rows 6 & 7. Other devices on the network connect to the L.A.K.E via NFS (Network File System) and use it as a shared network drive. Currently, the LAKE is being used as bulk storage for Music, Photos, etc. with an eventual goal of streaming movies and tv shows to the HTPC (Home Theater PC) on the network.
Row 6 & 7 - Storage
Row 6 & 7 are simply filled with 3.5“ Hard Drives that connect to the NAS server via SATA. Each one is in a used Dell PowerEdge Caddy and is hot swappable. The housing was 3d printed (STL) and designed by Printables user Nautilus Forge. In fact, Nautilus’ descriptions for the other materials were very handy for purchasing components.
The Male to Female (that’s me!) SATA Power adapters screw into the 3d printed housing with M2 screws and work surprisingly well. To power the drives, without a traditional power supply, I used a delightfully sketchy 12V to 4 SATA adapter, the other crime against nature, connected to a standard 12 V 5A 5.5mm power supply. Everything appears to be working and I have not had a house fire yet, fingers crossed.
Technically, you could fit 6 3.5“ Hard Drives into a 2U space, but I am concerned about thermal performance and I didn’t want to put together an active cooling system.
Footnotes:
-
Officially sanctioned pluralization of Ikea Kallax. ↩
-
“Neofetch is a command-line system information tool… [that] displays information about your operating system, software and hardware in an aesthetic and visually pleasing way.” Here’s their GitHub. ↩
-
Patrick Kennedy coined the term and wrote a great article on TinyMiniMicro workstations: “Introducing Project TinyMiniMicro Home Lab Revolution” ↩